Jam Breaker · 7 min read
Jam Breaker, Solved Step by Step: Reading a Real Car Park in 14 Moves
By Alex Lanka teamPublished
Rules explain what you may do; they rarely show how to think. So instead of general advice, this guide takes one real Jam Breaker puzzle — a medium one that the game says can be done in 14 moves — and walks through it the way a strong solver would: what to look at first, which tempting move goes nowhere, and how the answer is built backwards from the exit.
If you have not played yet: the board is a 6 × 6 car park. Every vehicle slides only along its own lane, a slide of any length counts as one move, and the puzzle is solved when the red car drives out through the gap on the right.
First look: what is actually in the way?
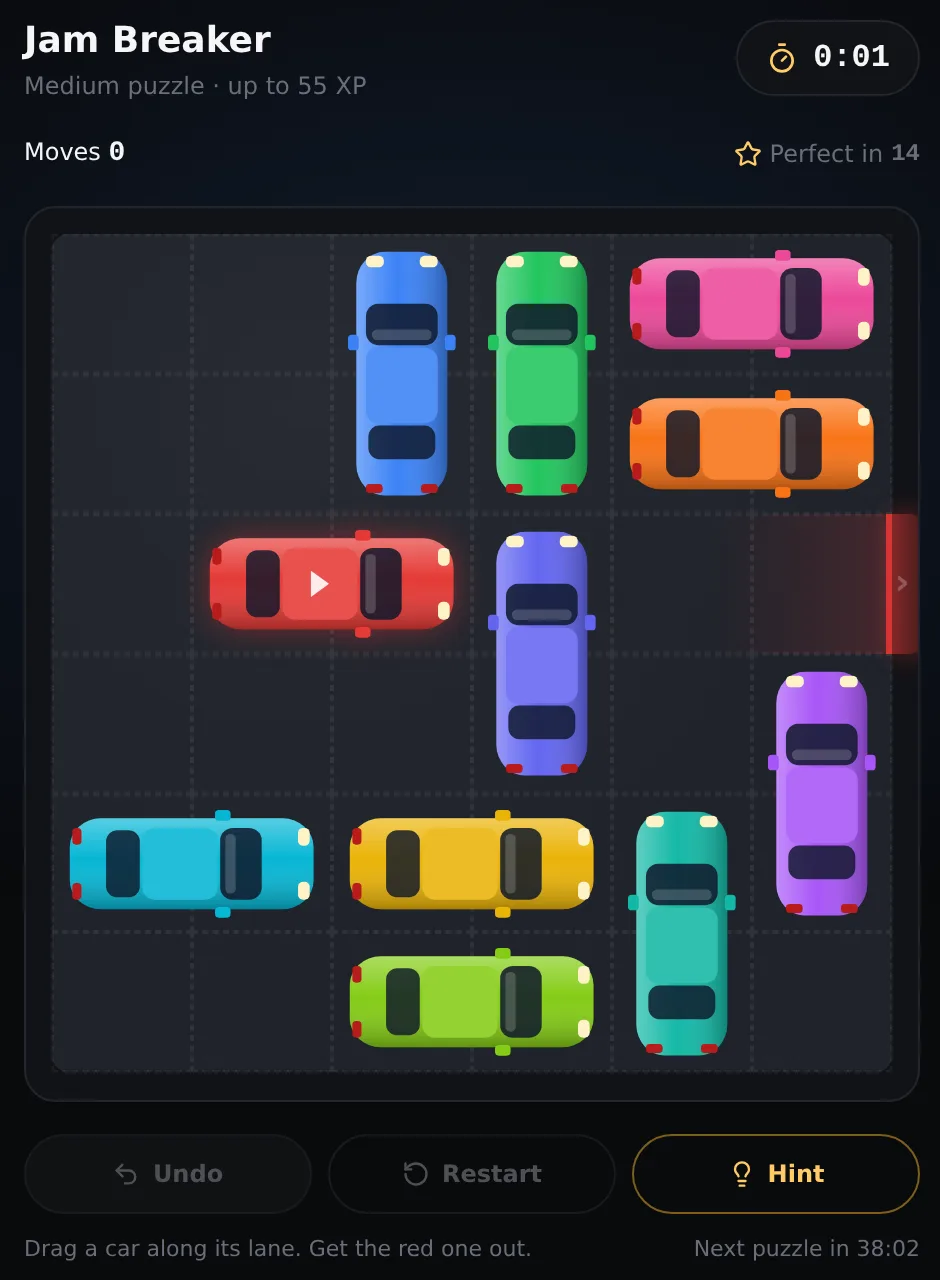
To name things, count the rows 1 to 6 from the top and the columns 1 to 6 from the left. The red car sits in row 3, in columns 2 and 3, and the exit is at the right-hand end of row 3. Between them, only one square is taken: column 4, where an upright blue-violet car stands across rows 3 and 4. Columns 5 and 6 of row 3 are empty.
So the whole puzzle seems to be one car. That is the first lesson of Jam Breaker: the number of cars on the board tells you nothing. What matters is the chain behind each blocker.
Why the obvious move fails
The blue-violet car can only move up or down its own column. Up is impossible: a green car fills rows 1 and 2 of that column, and it is already against the top wall. Down needs one free square in row 5 — and row 5 of column 4 is held by a yellow car lying sideways across columns 3 and 4.
The yellow car cannot help either. On its left is a light-blue car parked against the wall; on its right is an upright teal car. Most players try to shuffle these three and get nowhere, because each one is boxed in by the next. When a chain keeps folding back on itself like this, stop pushing cars and look at the edges of the board instead.
Reading the board backwards
Ask the question the other way round: for the red car to leave, which squares of row 3 must be empty at the very end? Columns 4, 5 and 6. Column 4 is the blue-violet car. But in the shortest solution two more cars pass through row 3 on the way — the teal car and a purple car standing upright in column 6 — because moving them up is what unlocks the bottom of the board. Both have to finish above row 3, and the only room above row 3 on the right is rows 1 and 2.
Rows 1 and 2 on the right are full: a pink car and an orange car lie sideways across columns 5 and 6. So the real puzzle is not the blue-violet car at all. It is getting the pink and orange cars out of the top-right corner, so the cars in columns 5 and 6 can climb out of the red car’s row.
For pink and orange to slide left, columns 2, 3 and 4 of rows 1 and 2 must be empty. Those hold a blue car (column 3) and the green car (column 4). Both are upright and both must go down — and that is what the first half of the solution is for.
The solution, move by move
- Move 1 — red car one square left, to the wall. It looks backwards, but it empties row 3 of column 3, which the blue car will need.
- Move 2 — purple car up one (rows 3 and 4). It now stands in the red car’s row for a while; that is fine, it frees row 5 of column 6.
- Move 3 — teal car up two, into rows 3 and 4 of column 5. Row 5 of column 5 is now free.
- Move 4 — yellow car two squares right, to columns 5 and 6. Columns 3 and 4 of row 5 are finally open.
- Move 5 — blue car down three, to rows 4 and 5 of column 3. The top of column 3 is clear.
- Move 6 — the light-green car in the bottom row one square left, so column 4 is free in row 6.
- Move 7 — blue-violet car down two, to rows 5 and 6. The original blocker is gone, but we are not done.
- Move 8 — green car down two, into rows 3 and 4 of column 4. Rows 1 and 2 of that column are empty.
- Moves 9 and 10 — pink car three left, then orange car three left. The top-right corner is open.
- Move 11 — green car back up two. Row 3 of column 4 is clear again.
- Moves 12 and 13 — purple car up two, teal car up two, both into the top-right corner the pink and orange cars left behind.
- Move 14 — red car four squares right and out.
What this puzzle teaches
Three habits carry over to every Jam Breaker round. First, look for the space a blocker will need at the end, not only for the blocker itself. Here the key squares were in the top-right corner, three rows away from the red car.
Second, a car that moves away and comes back — like the green car in moves 8 and 11 — is normal, not a mistake. The shortest solution often parks a car in the way for a few moves because nothing else can open a door for it.
Third, slide only as far as the plan needs. Pushing the blue-violet car two squares down instead of one in move 7 was not chosen for show: it had to clear row 4 as well, because the green car comes down into rows 3 and 4 in the very next move.
Going for Perfect
The game shows the fewest moves under the timer — “Perfect in 14” here. Reach the exit in exactly that many, without a hint, and you earn a quarter more XP and coins. Undo and Restart are allowed and only the moves of your final way out count, so it pays to find the chain first, press Restart, and then play it cleanly.
If you get stuck, Hint makes the next move of the shortest way out for you — it just means that round cannot be a Perfect.
In short: Do not ask “how do I move the blocker?” Ask “where must everything be when the red car leaves?” — and work backwards from there.